
Having a new home feels like a breath of fresh air. It comes with new scenery, new furniture, and a new life. Indeed, it also comes with a checklist of things you must do to ensure that your home has the necessary security measures.
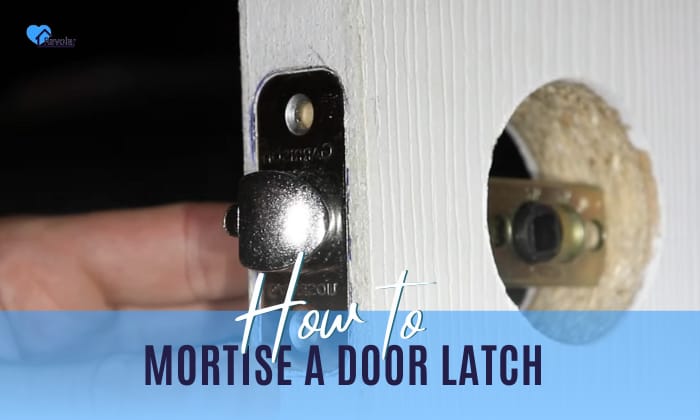
First thing first, do you know how to mortise a door latch? If not, read on as we help you improve your door security.
Table of Contents
- Step-by-step to Mortise a Door Latch
- Step 1: Remove the door stopper
- Step 2: Mark the middle of the door latch
- Step 3: Transfer the height mark
- Step 4: Mark the plate outline
- Step 5: Prepare your router bit
- Step 6: Set the depth of the route
- Step 7: Route the outline with a door strike plate cutter
- Step 8: Check the hole.
- Step 9: Adjust your router bit.
- Step 10: Cut hole in door frame for lock.
- Step 11: Drill hole for screws.
- Step 12: Install a strike plate on the door frame.
- Step 13: Mark the outline of the door latch plate.
- Step 14: Adjust your router bit.
- Step 15: Make a hole for the door latch plate.
- Step 16: Drill door latch hole for the screw.
- Step 17: Install door latch plate.
- Step 18: Install the door handle.
- Step 19: Test your door lock.
- Tips to Fit the Door Stops to the Frame After Fitting a Mortice Latch
- Conclusion
Step-by-step to Mortise a Door Latch
If you are going to mortise a door strike plate and door latch all by yourself, you must prepare the following materials first:
- Pencil
- A measuring tape
- Battery-powered drill
- Screwdriver
- Router bit
- Screws
- Chisel
- White wood filler
- Router attachment
To mortise a door latch plate and strike plate, follow these steps:
Step 1: Remove the door stopper
Before you are going to mortise a door jamb, make sure there is no door stopper installed. A door stopper might disable the attachment of the door jamb with a router.
Step 2: Mark the middle of the door latch
Grab your pencil and mark the center of the door latch. This will serve as your guide for later steps.
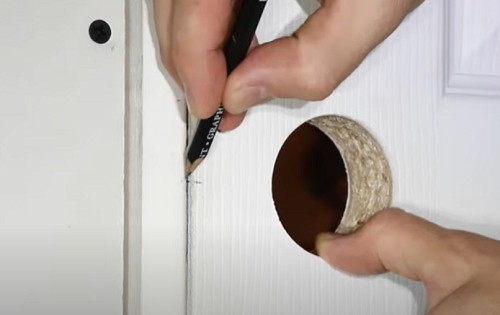
Step 3: Transfer the height mark

Close the door so that the door latch and the door jamb are facing each other. Transfer the mark by marking the opposite side of the door jamb.
Step 4: Mark the plate outline
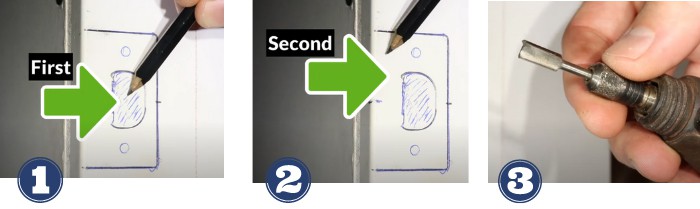
Place the strike plate on the door jamb and mark the spaces that are needed to be chiseled. Make sure that the strike plate sticks out past the point where the metal starts to curve or bend.
Step 5: Prepare your router bit
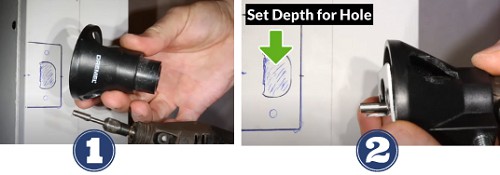
You can mortise the strike plate with Dremel with a router bit or other cutting tools. If your routing kit comes with a router attachment, you can also use it to help you guide your routing bit.
Step 6: Set the depth of the route
When you are going to mortise a door frame, you should adjust the depth that the route will drill. This will help you avoid drilling more or less than the required depth.
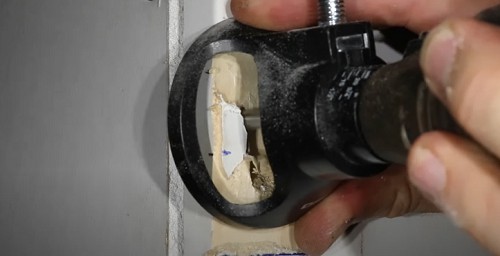
Step 7: Route the outline with a door strike plate cutter
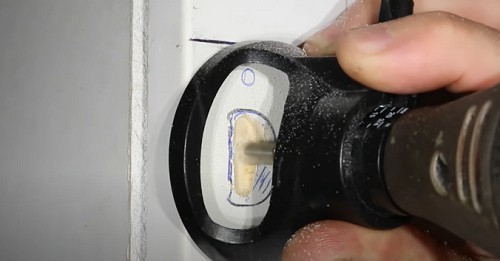
With your strike plate and door latch mortise tool, slowly route the inside outline of the strike plate first. Do not push too hard all at once when you route the hole and get every nook and cranny of the outline.
Note: since you are using power tools to cut out the door latch and strike plate, make sure you are wearing safety goggles.
Step 8: Check the hole.
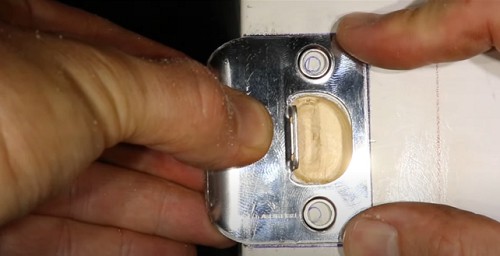
Position your metal strike plate on the door jamb. If the hole doesn’t fit the strike plate, you can always do it again to make it perfect.
Step 9: Adjust your router bit.
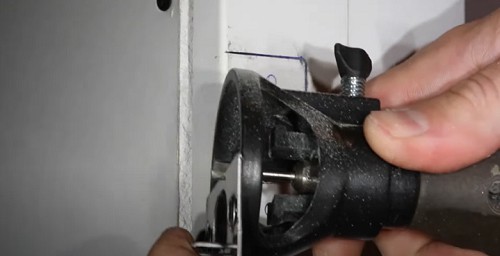
If the depth of the inner hole of the strike plate is already perfect, you can now proceed to route the outer area. Make sure you adjust the router bit so that the area will only be routed shallow.
Step 10: Cut hole in door frame for lock.
Slowly cut out the rest of the outer area with your router bit. If there are areas that the router bit cannot reach, cut it out manually with a chisel.
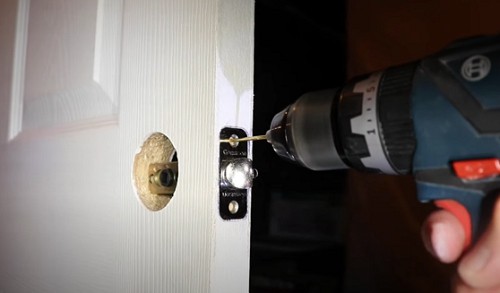
Step 11: Drill hole for screws.
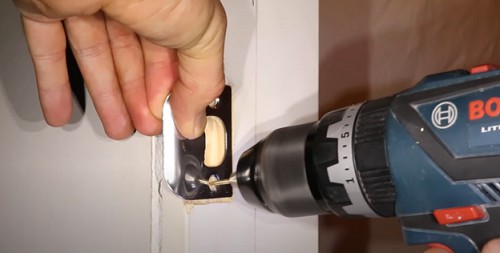
Position your strike plate so you know where the screws will go. Take your battery-powered drill and make two holes for the screws.
Step 12: Install a strike plate on the door frame.
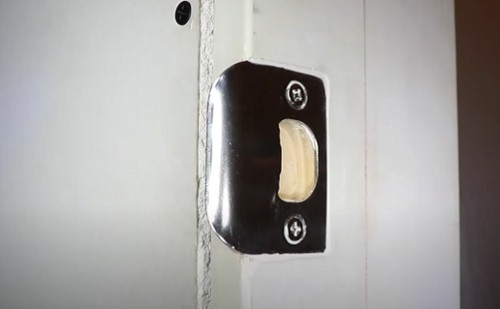
Drill the screws onto the holes to fasten the strike plate onto the door frame. If there are gaps or you have misrouted, you can put white wood filler to make it look perfect.
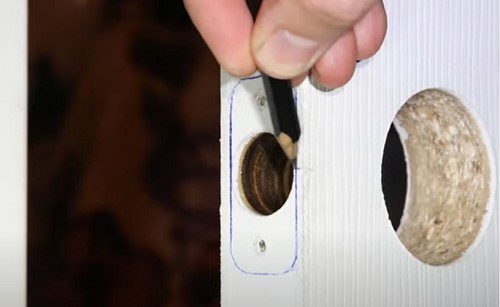
Step 13: Mark the outline of the door latch plate.
Grab your pencil and mark the perimeter of the door latch plate. This will serve as your guide for routing later.
Step 14: Adjust your router bit.

Place your strike plate beside the router attachment. This will help you adjust the depth of your router bit.
Step 15: Make a hole for the door latch plate.
Start by routing from the top to the bottom with your door latch cutting tool. If you observe that your door latch hole is small, you can make the door latch hole bigger by using the router bit.
Note: if there are discrepancies in the routing procedure, you can manually chisel the door latch hole.
If your door doesn’t have an existing hole for the door latch, you might want to buy certain tools for it such as the Ryobi door latch installation kit.
This kit comes with a door latch mortise jig and tool to cut the door knob hole that will help for the door latch.
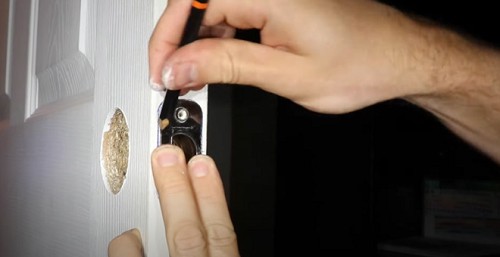
Step 16: Drill door latch hole for the screw.
Attach the door latch first so you’ll know where to drill the holes. With your battery-powered drill and drill bit, make two holes for the screws to be inserted.
Step 17: Install door latch plate.
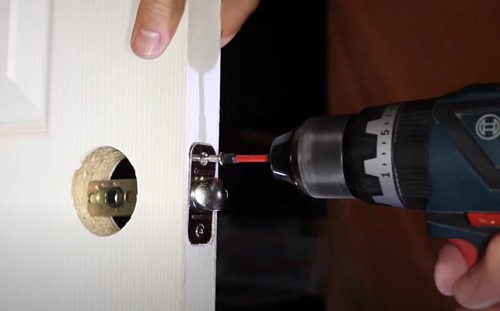
After you have drilled holes for the screws, fasten the screws with your drill. Make sure the door latch plate is flushed onto the door so that it won’t get stuck if the door is closed.
Step 18: Install the door handle.
If your door latch is already installed, you can now install your door handle. You have to mortise a pocket door handle first before you can install one.
Step 19: Test your door lock.
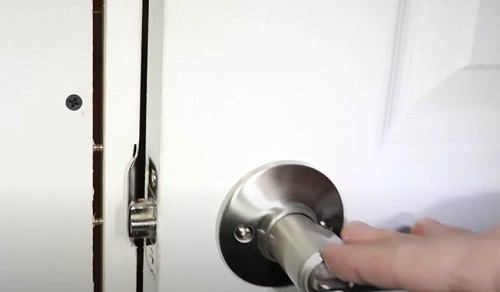
Open and close your door to see if the door remains closed when it is closed. The latch should also retract if you turn the door knob.
Note: if you have problems with your hinges, you can try to buy a new one and mortise a door hinge easily.
Related: 5 Causes & Ways to Fix Door Locks Won’t Retract
Tips to Fit the Door Stops to the Frame After Fitting a Mortice Latch
A door stop can hold your door closed or opened and prevent it from opening too widely. Here are some tips to fit your door stop to the frame after fitting a mortice latch:
- When pinning the stops to the frame, make use of a spacer such as a piece of cardboard.
- When installing a door stop, if you have to close the door first so it is latched in position.
- If there are pins sticking out, just use a nail punch to hide the pins’ heads.
Conclusion
The best way you can ensure that the work is done perfectly is to do it yourself. If you have the materials, tools, and basic handiness skills, there is no reason not to do the work.
Knowing how to mortise a door latch can not only improve your handiness skills, but also help you save money from hiring an expensive locksmith. Share this tip to your friends to help them with their door problems.

I am the last member to join Revolar and might be just the luckiest to work with dedicated people like Teddy and John. Our team has established a process where my only job is writing the best content to deliver incredible ideas and guides.